Use math, science, and creativity to create kites!

Andō Hiroshige (Japanese, 1797–1858), Kakegawa from the series The Fifty-Three Stations of the Tōkaidō Road, 1833-34, woodblock print. Gift of Kate Fowler Merle-Smith, 1976. (1976.20.118.27)
The artwork, Kakegawa from the series The Fifty-Three Stations of the Tōkaidō Road, shows several people outdoors flying kites. Kites were first flown in China over 2,000 years ago, and are now flown all over the world. Kites were first created to share messages, but over time became a way to have fun and pass time with others.
While creativity is needed to make the kites visually appealing, math and science is also needed to ensure your kite flies. The sail of the kite catches the air and provides lift, the spar and spine forms the support, and the line keeps the kite from flying away. Make your own kite to learn more about the function of the kite while creating a piece of art.
Supplies Needed:
- Two 20-inch stick material (examples: straws, wooden skewers, etc.)
- 24×24-inch paper or fabric
- Scissors
- Ruler
- Glue (hot glue or liquid glue)
- Tape
- Yarn or string
- Pen or pencil
- Ribbon (optional)
- Other art supplies for decoration (optional)
Steps to Make Your Kite:

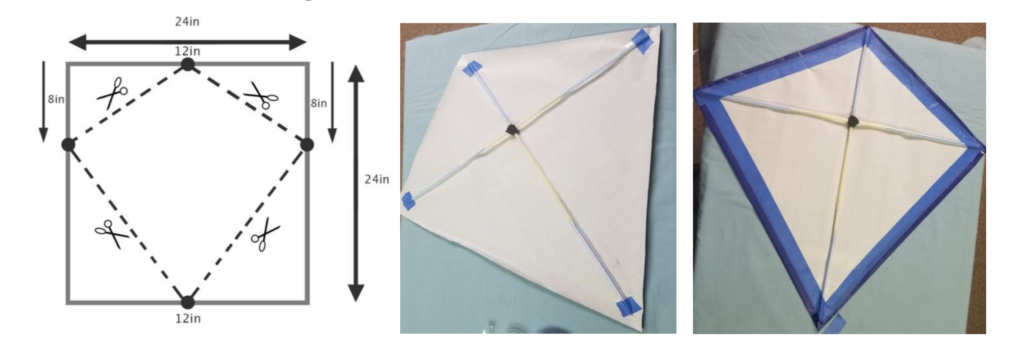
- Create the sail by starting with your 24×24-inch paper or fabric. On the bottom of your paper or fabric, measure and mark 12-inches in towards the center. Repeat with the top of your paper or fabric. On the left and right sides, measure and mark 8-inches from the top on each side. Connect the marks, then cut out along the lines.
- Use an assortment of art supplies to decorate and customize both sides of your sail.
- Make the spar and spine of the kite by creating a x-shape with your stick material, intersecting 8-inches from the top of the vertical stick and then securing. Place the spar and spine on the sail. Tape down the edges of the spar and spine. Fold excess paper over the edges of the spar and spine and secure–this keeps the wind from pulling your kite apart.
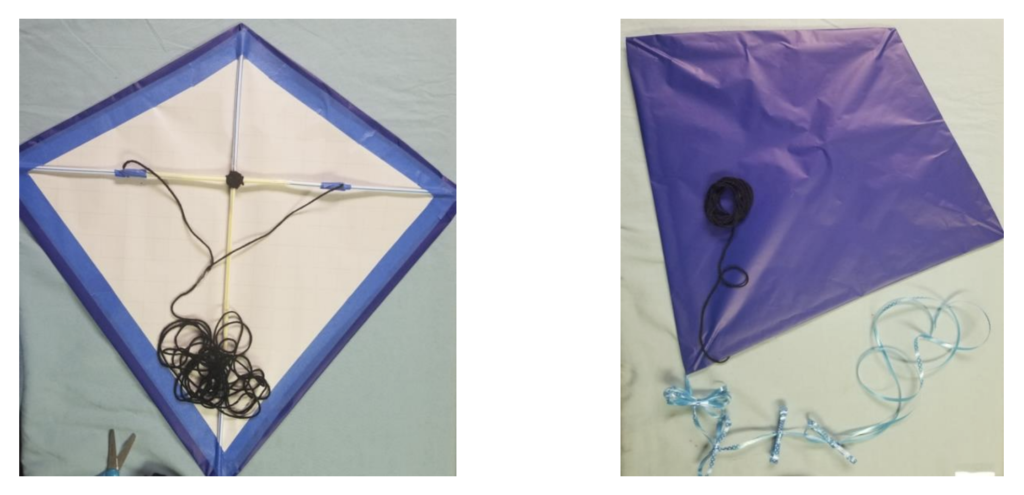
- Cut a piece of string about the length of your horizontal stick. Tie both ends of the string mid-way on each side of the horizontal stick. Secure the edges of your knots to prevent them from falling off.
- Create the line for the kite by measuring out a long piece of string. Tie the line to the horizontal piece of string and secure the knot.
- Optional, add a tail to your kite! Tie ribbon to the stick at the bottom of your kite and secure the knot. Add bows, poms, or tassels to your tail for extra decoration.


